Create
Rich Text E-Mail
Before we start, let me re-emphasize that these instructions are for users of Outlook Express 5. While others may benefit from this tutorial, other mail programs address this differently, and you should utilize the methods, if any, associated with them.
Getting Started...
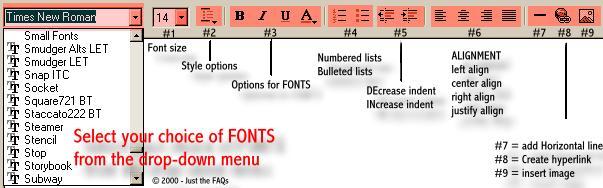
Open your Outlook Express program, and you'll see a similar toolbar to the one below. Yours may not be exactly like this one, as this one has been customized to my preferences. But all of the functions I'll explain are available from yours. You can do this, following these instructions as you go. Just minimize this window, OR your mail program, and follow along.
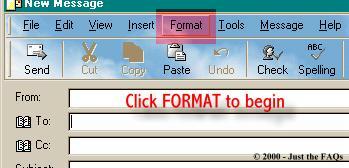
illus. [1]Select message to open a New Message compose window.
illus. [2]
When you have the new window, select Format from the toolbar.
illus. [3]
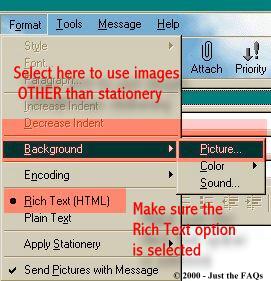
Once you've selected Format, a drop-down menu will appear. Now, make SURE you've selected the Rich Text option. The first Rich Text message we're going to create is one using NO stationery.
We'll create one using either a solid colored background (or a background image from your files), and add pictures and "pretties" along the way.
If you want to use a background image for your message, you will select the "Picture"...option now. Remember, the image you choose will behave as a standard background, and tile over the entire message background, so choose accordingly.
illus. [4]
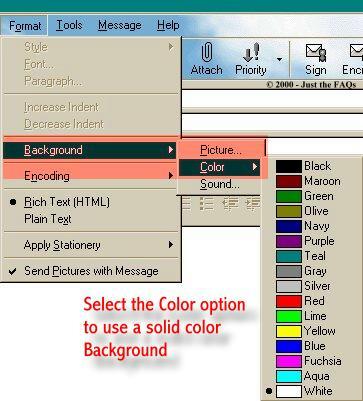
For now, though, we're going to choose a solid color to use as a background. This is what you will see.
illus. [5]
Make your selection from the colors available by just clicking on that color. The compose area of your message will change to this color once you check it. Now, let's add an image to the background color.
We'll come back to using a background image a little later.
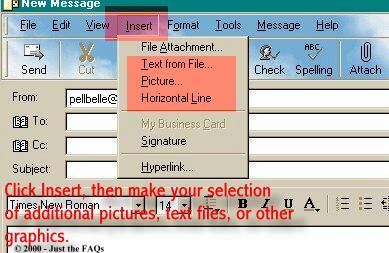
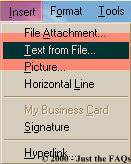
Click on Insert from the toolbar. A new drop-down menu will appear. From this menu you'll be able to select, graphics, text files, and the standard horizontal line. If you wish to use special bars or dividers that YOU have, select the Insert/Picture option.
For this step, though, we're going to select Picture.
illus. [6]
When you select Picture, the window below will pop open on your screen. Click on Browse. It will open another window that will allow you to search your files and folders for the pictures you want to use. (see illus. [8])
illus. [7]
illus. [8]
Search through your files till you find the picture you want to use. Double click it to select it. The filename will appear in the box.
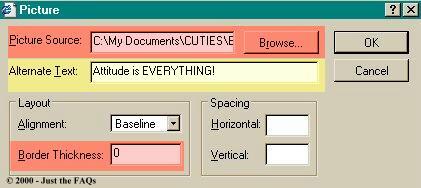
You'll now be taken BACK to the Picture source window to make your final adjustments to the image you want inserted.
If you'll look at the illustration below.....notice the option for Border thickness. This can be set to Zero (0) for NO border, or a number.......the number chosen is pixels. 5-10 is pretty standard, but strictly a matter of choice.
The line to add Alternate Text gives you the option to add a description or a phrase. This is what people will see if they aren't able to recieve images. Also....if this is filled in, when the image is moused over, this text will appear in a box.
Once you have everything to your liking, click OK, and the picture will appear on your message window.
illus. [7]
Your message compose window should now have a solid color background and an image inserted. The placement of any images to the message can be controlled by using the alignment options (#6) from the FORMAT toolbar on the message compose window. See below; illus.[9]
illus.[9]
Actually, nearly all of what we've covered in the above steps CAN be done from here, but you need to know HOW to use them. This is the reason, I've chosen to explain it in the most basic terms. Later, when you've mastered this, you'll find the use of the Format Toolbar faster in lots of instances.
Inserting Text and content
If you want to simply send a message, decide what kind of FONT you wish to use, as well as colors, boldness, or any other options, and just type your message. If you have a text file that you wish to add to this message, you can add it by clicking on insert, and then browsing your files, then selecting to one you want.
illus. [10]
The browse window will open as in illustration [8], but it will be called "Insert Text File" Window. Just follow the same steps, till you find the text you want and double clicking it will insert it into your message.
You may want to use it exactly as you have it saved, or you may want to remove any formatting that might have been saved with it. If you do, simply right click the filename to OPEN it. It should open in Notepad.
Make any changes to it, then go to Edit on the Notepad toolbar, select all, then copy. Move your cursor back to your mail message, and click it in the body of the mesage where you want the text to appear, then select Paste from the Message Toolbar. (NOTE: select your preferences for FONT type, size, color, etc. BEFORE you PASTE.)
You've now created your first Rich Text E- Mail message. The next page will cover adding sounds to this message.
Remember, the recipient of the mail MUST be able to receive mail in a Rich Text format to fully appreciate what you've created!
Introduction - Creative E-Mail
Part Two - Adding Sounds
Part Three - Using Stationery
Part Four - Creating Your Own Stationery
Part Five - Adding a Scroll Effect
© 2000, 2001, 2002 - Sunny's Stuff - All Rights Reserved, Worldwide
This tutorial and graphics may not be reproduced in part or whole without express permission of Sunny's StuffDISCLAIMER:
I do not claim ownership of the ideas presented here, but the composition of the words, the design of these pages, and the presentation of the material offered is mine.